when disaster strikes...rust on my expensive jeweler's files

We recently moved, and a couple of days ago I was unpacking boxes. I admit, I got lazy and left a couple of flip-top containers on the back porch, and when I unpacked them, I realized that I had a small disaster on my hands. There were damp paper towels in the box, and a small puddle of water in the bottom. All of my expensive jeweler's files were covered with rust.

I decided to tackle the worst one...the flat file, fourth from the right.

Luckily, my expensive Fretz jeweler's hammers were fine, with no rust to be found on them. A testament to Bill Fretz's excellent craftsmanship.

But what to do with the files? And these are not your run-of-the-mill Home Depot or Harbor Freight files. These are my good $35-40 European jewelers' files.

I posted a question on a forum, and got several recommendations, ranging from Barkeeper's Friend to muriatic acid (from Kevin Potter, metalsmith extraordinaire and maker of the wonderful Potter Hydraulic Press for jewelers). As my mind wandered back to a college chemistry experiment where we used acid to dissolve a paper clip, I worried even more! Could the acid destroy the file?

But since the only "acid" I had on hand was vinegar, I chose to use the recommendation of another jeweler, Catherine Franz, on that technique. I still had no idea what to expect, since a file has a lot of tiny crevices. 

It was a miraculous solution to the problem!

DISCLAIMER: I'm providing the information for you to use at your own risk...this worked on my files, and I've copied those instructions here faithfully. However, I can't be responsible for any damage done to anyone's tools! :-)

Step 1

I soaked the file in a glass dish of regular household vinegar, propping up the tang/handle of the file on a drinking straw to raise the surface off the bottom of the dish. I was really surprised to see the vinegar attack the rust. (click on the image to see the bubbles).

Step 2

I did NOT do this when I cleaned my file, but in hindsight, I should have scrubbed the file occasionally with a fine-bristle, soft brass brush or stiff toothbrush. The rust acted as a "resist," and could potentially leave a surface that's not perfectly flat. Here's a link to a brass brush similar to the one I used.

Step 3

I left the file in the vinegar for 24 hours (accidentally!). It was in the the hot Texas sun, but heating the vinegar slightly might give it a good start.

Step 4

I made a paste of baking soda and water, then used a toothbrush to clean the file and neutralize the acid. I rinsed and dried the file completely.

Step 5

I used machinist's oil to oil the file, and dabbed away the excess. I ordered some Starrett Tool and Instrument Oil from Amazon.

Anyway, my file is in better shape than it was before! Here's the result...click the image to view it larger.

The cleaned file (click to enlarge)

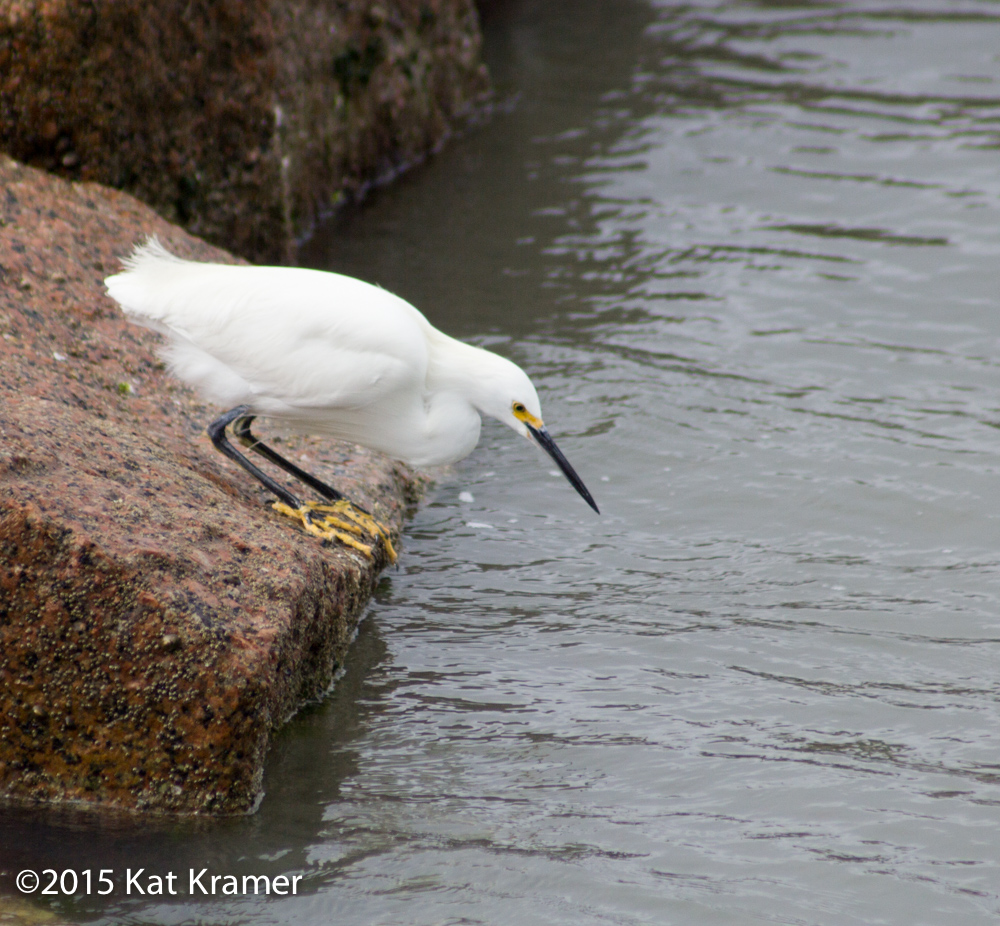
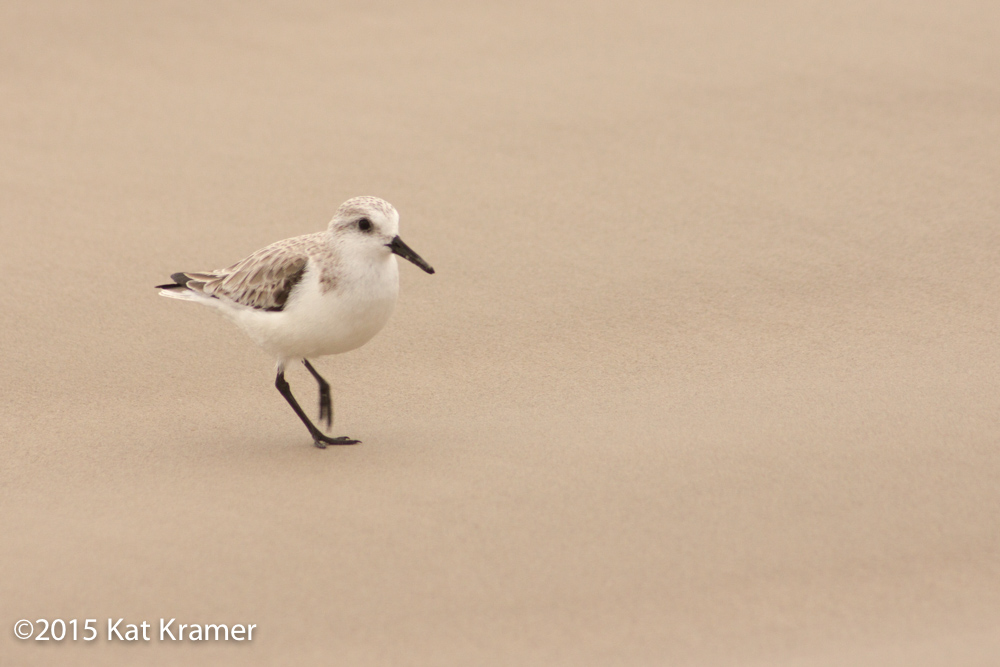
photographing the local wildlife...

As we're nearing the end of our stay on the Texas Gulf Coast, I realized that I hadn't spent any time photographing anything! Maybe some HDR photos on our iPhones of the sunset in the channel, and a little video of a dolphin that came up to play. 

So I finally took out the camera and spent an afternoon looking for birds as subjects for watercolor and acrylic. I didn't really need them to turn out well. I just needed to capture the colors and the rough shapes. That's not what I got...they were better than expected.

Anyway, I took some pictures that didn't turn out all that bad...I'm sure the critters were annoyed with me chasing them around, but I love the expressions on their faces. Birds do have expressions, don't they?

I also thought that these will make great photos I can use for jewelry designs...

This was also an experiment with Adobe Lightroom. I'll write more about that later.

editing Ebola K...

For the month of January and February, Bobby announced that we were taking off for Port Aransas, Texas so he could finish up the second installment in his book series, Ebola K. I love the beach, so I can't complain!  As it turns out, he's a little tired of the cold weather, and craving Mexican food. 

This was one of the hardest books yet. There is so much research that goes into a fiction book based on real life, and this book has some interesting explorations into the more emotional side of what might happen during a pandemic. He even found information about the influenza epidemic from the early 1900s...they had to post guards near trains because people were stealing coffins. Or the fact that terror groups in Africa are killing elephants to steal their tusks, doing some unimaginable things to the poor creatures. But as always, it's Bobby's goal to educate the reader while giving them an escape into another world.

After a long final week, we did it. We had a hard deadline with Amazon for Valentine's Day, and missing that deadline would mean losing all of the preorders. So with the pressure on, we had to get it done. Margaret and Bryan, Bobby's ex brother- and sister-in-law came in for a vacation...heh, heh, heh. We put them to work. Since Margaret has edited Bobby's books in the past, the timing was perfect. Bryan assumed "manservant" duty, and kept us in great food for the weekend.

On Saturday, we uploaded. And the book is out next Tuesday, February 24th. Check it out!

casting jewelry...making the tree (part three)

Closeup of one of the wax models - needs cleanup!

Okay, I wish I had more pictures for this post. But once you make all of those little wax models, you then have to INSPECT them to find the ones that are pretty close to perfect. After talking with a couple of jewelry experts this week, I learned that there is a fine line between making the wax perfect, or making the wax "close enough." Either way, the casting will have to be cleaned up.

So I opted for "close enough." Not really my style, since I'm a perfectionist. But the nice thing about casting metal is that if it doesn't work, you can melt it down and cast it again.

Now it's time to mount these little guys onto a stick of wax called a "sprue," making a tree formation so that multiples can be cast simultaneously. The sprue is mounted on a rubber base, which is removed before the tree goes into a kiln to melt out the wax. You've seen my tree, but check out this tree from the Kerr brochure...

Photo from Kerr's casting brochure showing wax tree with stones to be cast in place

Photo from Kerr's casting brochure showing wax tree with stones to be cast in place

The other thing I learned from the Kerr brochure is that stones can be cast in place! I'm guessing these diamond were mounted in the wax models, then cast. Now I'll be out "chasing squirrels" in my quest to find out how this is done. (Wow, couldn't wait on that one...here's a link.)

Kerr is a company that makes waxes, "investment," and tools for dental work, but it's also used for jewelry. Since I haven't bothered to read the manual for my casting machine (I'm a Mac user, and we don't "do" manuals...), I've had to research how this all comes together. There is information out there for making wax models. There is information about mixing the "investment" (heat-resistant plaster-type material), there is information about burning out the metal flask. Then you have to know how your casting machine works. 

Gosh, it makes me miss that cute little Jewelcast machine from my first post.

Selection of perforated flasks from Pepe Tools

So the next step is to "invest" the wax tree. I'll prepare the perforated flask, then I'll apply a spray that will reduce bubbles on the wax models, mix the investment, vacuum the bubbles out, then pour it in. Seems easy enough. Then I learn that preparing the investment and burning out the flask will take about ten hours. That was unexpected! Agh...I guess I'll spend Black Friday babysitting my kiln. That's okay. I've got a couple of Etsy orders to fill.

You might be looking at the picture of perforated flasks to the right, wondering how in the world one might pour wet plaster into the flask without it flowing out. The answer? TAPE. Then it has to sit for a couple of hours before going into the kiln.

So more about that burnout schedule...and some information from Kerr. Looks like you hold the kiln temperature around 300°F for about an hour to melt out the wax, although another page I found on the internet recommends three hours. Then you ramp up the kiln to completely burn out any wax residue, then remove the flask while it's around 900°F – 1000°F, put it on the vacuum caster, and pour molten metal into the cavity. 

Here's a link to their brochure that shows the burnout schedule. I'm using the middle-sized flask.

Anyway, back down to the studio to start preparing the flask...stay tuned!

casting jewelry...making wax models (part two)

"Tree" of wax models on a rubber base

Now that I have a mold, it's time to try wax injection to make multiples. I'll show you the photo of the end goal first, so you can see what I'm shooting for.

This is a "tree" made out of the smaller wax models. It will be then embedded in a heat-resistant plaster, the wax melted out, and molten metal sucked into the cavity left by the molten wax. This s the traditional lost wax casting you might have heard of.

Want to know why your dentist charges so much for a crown? It's because your dental crowns and bridges are made by this process. When the dentist makes a mold of your mouth with that rubbery stuff, they use it to create a mold that can create a wax that is then used to cast the cap.

Manual wax injection machine with mold

So here's the process. I made the original silicone molds in the last blog post, then used a sharp knife to split the molds (another YouTube video). Wavy cuts keep the mold aligned correctly.

Now it's time to fill them with wax. I have an injection wax unit that I recently purchased, and all I knew about it was that I have to put some wax in it, turn it on, and voila! Well, it was a little more complicated that that...

It ends up you have to pump up the unit, then push the mold onto a nozzle. Sounds easy enough! Well, the reality is that the pressure level is more important than I thought—and instructions say "keep the pressure between 3 and 15 psi." Well, which is it? It ends up you just have to experiment. Something about the temperature of the wax and correct psi that will make a clean model.

Completed wax model in the mold

I also found that putting the rubber mold between two pieces of acrylic helped make a better wax model. When I didn't do that, wax oozed between the cuts in the mold, and made a really messy model. I turned the pressure down, and everything worked better. However, holding the acrylic plates hurt my hands, and a shooting pain went through the top part of my hand. Of course the problem sent me off looking for something online to hold the mold. I couldn't possibly be the first person on earth to have this issue?

Sixty dollars and fifteen minutes later, a mold holder was on its way from Rio Grande Jewelry Supply. I love the internet.

Silicone mold with cornstarch dusting

I also noticed that some of the waxes had places where the mold wasn't filling completely. I also saw something that I'm familiar with from working with glass, and also ironically from working at Apple years ago. Apple had a VERY expensive Cray computer that simulated mold pours of the plastic casing of Apple's computers. It would show where the molten plastic would cool while pouring, showing what is known as "chill marks." Those are undesirable, by the way.

It ends up my waxes were doing the same thing. A quick post on Metalsmiths Coffehouse on Facebook provided another suggestion: dust the mold with cornstarch. Another YouTube video suggested cutting vents in the rubber to allow air to escape.

The mold to the left has already been injected, as you can tell from the red staining from the wax. The cornstarch dusting and vents worked perfectly.

I got back to work making waxes. I didn't realize until later that night that some of them had small holes or were incomplete. I might need a new pair of glasses! So I threw those back in the injector tank and made more. It ends up that making extras is a GOOD IDEA.

The end result, a BUNCH of my new little pendant clasps, ready to be attached to the tree.

Wax models from both silicone molds, ready to be attached to a tree.

Wax models from both silicone molds, ready to be attached to a tree.