Huichol Flower Earring Tutorial
This is a quick and easy tutorial on how to create a colorful flower pendant, earrings, or even elegant package decoration. This beginner tutorial features a small loop at the top, but you'll find other versions on the internet that have more decorative tops and even fringe.
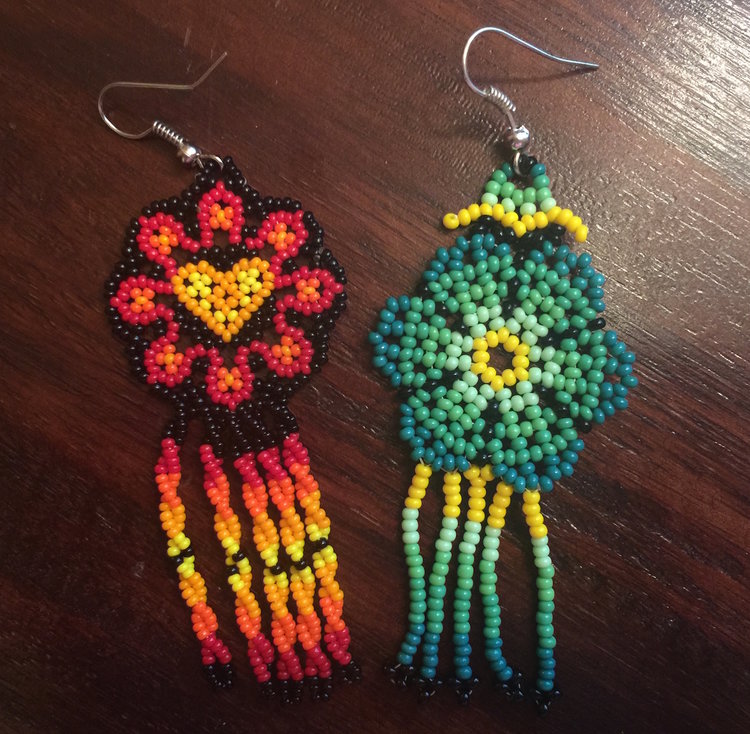
I won't copy the work of other artists, but show how to create a more generic version of this style of earring. The two earrings to the right were purchased from Huichol artists in Mexico, and amazingly, the red heart version features beads that are smaller than the usual 11/0. I'm in AWE of this artist's work! I make a point of purchasing new pieces each time I take a cruise from a little cart across from the cruise terminal in Cozumel—it's at a cart in the Royal Village shopping center across the street, near Café Punte del Cielo, and occasionally you'll get a chance to see one of the artists at work. They are reasonably priced, and the pieces are handmade.
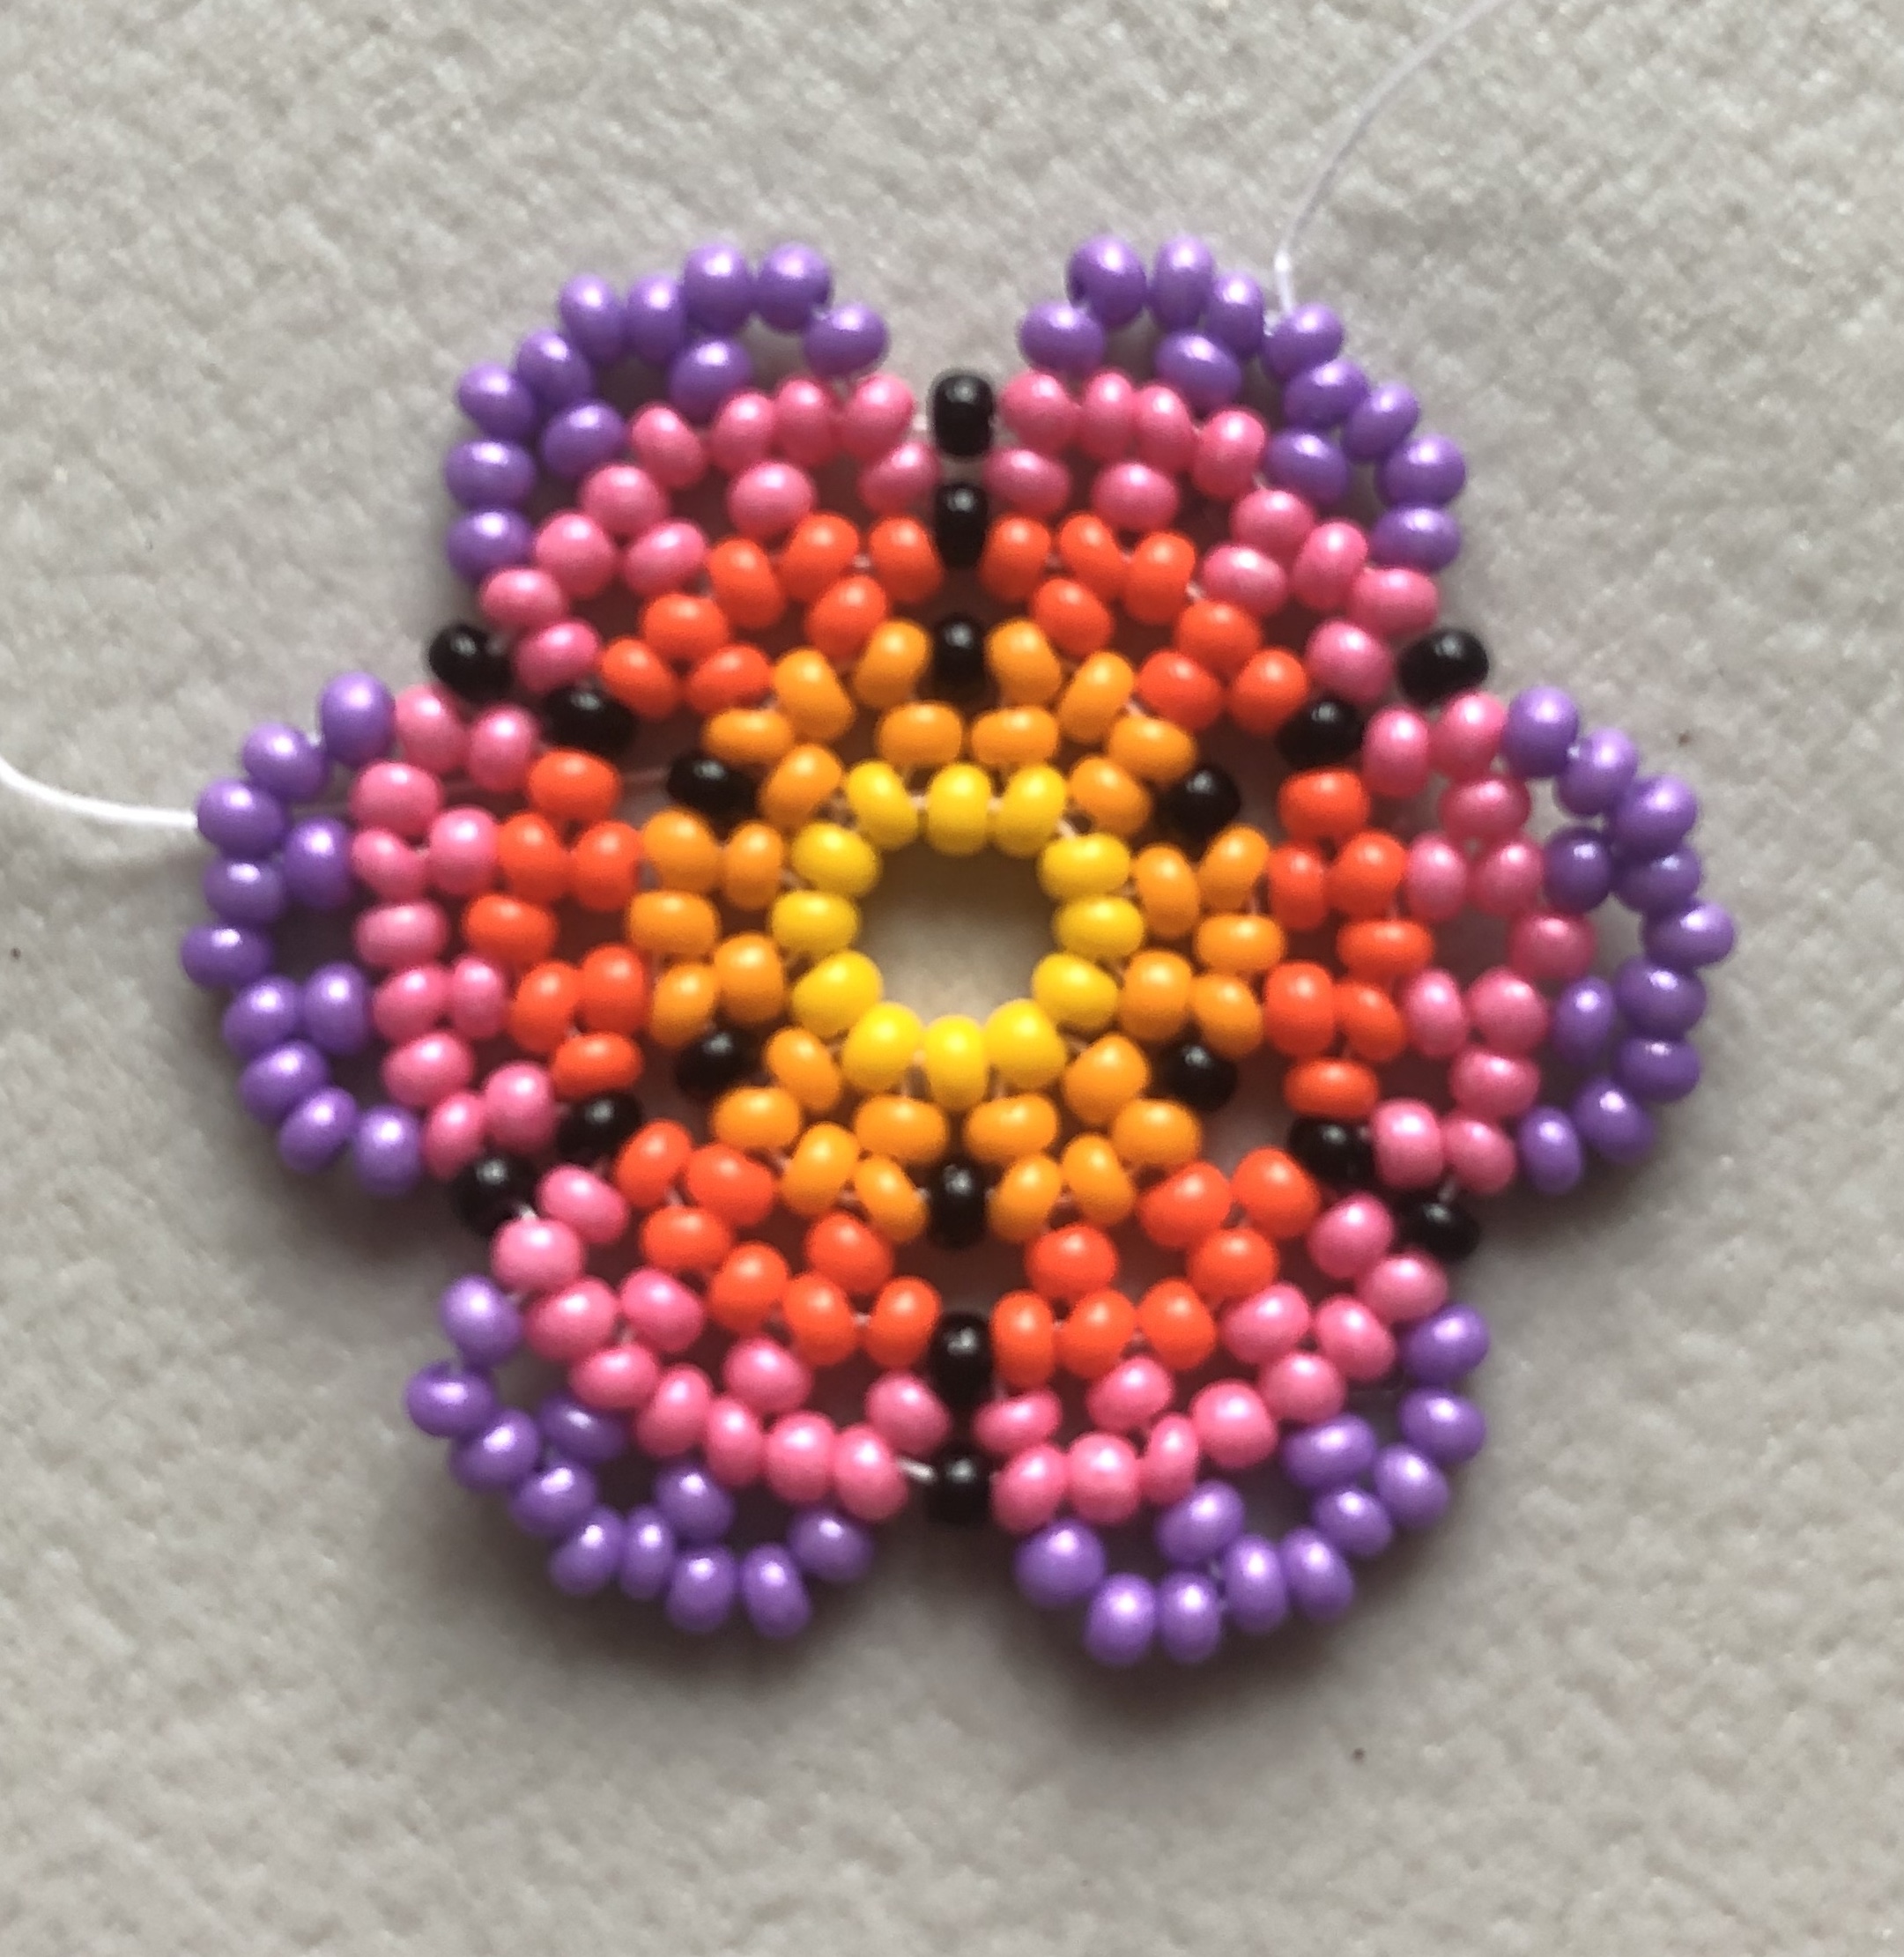
The pink flower I created using some of Preciosa’s gel colors.
About the Beads Used
In the beginning, I had difficulty with the first beads I purchased from a local bead store, but later learned that the Huichol artists use Czech Preciosa Ornelo rocaille beads exclusively, mostly in a size 11/0. I purchased mine from Shipwreck Beads, but also found them at Fire Mountain. Toho 11/0 seed beads also work, but will result in a slightly larger pattern. (Unfortunately, I have not been happy with the general stock tubes of beads purchased at local bead stores.) I think looking at the colors at Fire Mountain is easier with a nice layout, and the prices are similar at both if you are buying in quantity. If you don't have the links below, search Czech Seed Beads 11/0 Opaque. I buy them in hanks, but they’re also sold loose. The most durable choice will be the opaque or transparent beds, although some of the brighter colors (like the pinks and purples) have a coating that makes them a little less durable.
Click here for a handy link to the Preciosa Ornelo beads at Shipwreck
Click here for a handy link to the same beads at Fire Mountain
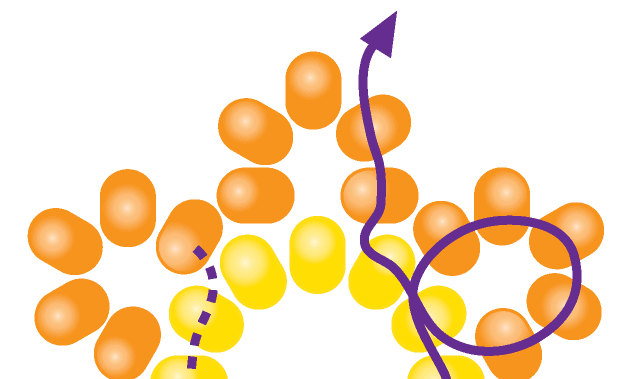
One last note...I do not consider myself a "beader," so my diagrams are a mix of styles I've found that work for me. The only thing I might point out is that a "dashed" line shows where the thread was coming from in the previous step. I also lighten the previous rows of beads to focus on the new beads being added. I usually have a second image that shows the new beads in context.
About the Thread Used
Huichol bracelets use a different thread that I have not been able to identify, but I've seen Polymide thread used. I used 10lb Fireline here for illustration purposes. A stiffer thread will create earrings that retain their shape a little better.
You want to make sure that your thread will fit through the holes of the beads. Size 11/0 Preciosa Rocaille Seed Beads have a minimum hole size of 0.60mm. 10lb Fireline is 0.20mm in diameter, so you can theoretically go through each bead three times. Preciosa publishes information about the size of their beads with this handy color chart.
Material List
Preciosa Rocaille beads, 11/0 in six colors…a yellow for the center green for the loop, and four other colors, preferably in a light-to-dark colors. In this project I use the following Shipwreck Bead colors (Shipwreck product # in parentheses):
Terra/Coated Opaque Pink (11SB192-TA)
Terra/Coated Opaque Purple (11SB197-TA)
Light Orange (11SB132)
Dark Orange (11SB134)
Light Yellow (11SB122)
Opaque Medium Green (11SB183)
Wildfire Thermally Bonded Bead Weaving Thread, .008 in, 0.20 mm, in white
Size 10 beading needle (a needle with larger hole will work as long as it fits through the beads). I also like the Beadalon Collapsible Eye Needles in a 2.5 in (6.4 cm) length
Sharp scissors (I have a nice small pair of Gingher scissors)
This tutorial, worksheets, all photos, and all diagrams are COPYRIGHTED, and may not be reproduced or sold without permission. If you are interested in using this tutorial, graphincs, or handout for teaching, please contact me directly. ©2017, Kat Kramer Adair.
Row 1
Cut a piece of Fireline that's comfortable to work with. I usually cut a piece about 2 to 2-1/2 feet. Thread the needle with the Fireline (I need my 5x Opti-Visor to do this!).
Create a stop bead with the first yellow bead (this diagram shows it in green, but yours will be YELLOW). Leave a tail that's about an inch, then pass the needle through the bead, then go back through the same hole again. Tighten the thread around the bead. This will prevent the other beads from coming off the thread.
Alternatively, you can thread the first row of beads, create a loop, and go back through the beads one more time.
Fig 2: Thread eleven more yellow beads if using a stop bead, for a total of twelve yellow beads
Creating the Loop
With the needle, go back through the end bead to make a circle. I prefer to go back through the entire loop again, then through the next two beads.
Figure 3 shows going through the stop bead, then through the next two beads. This will put you in the correct position for the first row of the petals.
You'll trim the excess thread off at the end.
Row 2
Thread five of the light orange beads (or other color). Then go back through the yellow bead as shown, through the next two yellow beads.
Thread five more of the orange beads, go back through the yellow bead and the next two beads.
Continue until you get to the last petal.
Finishing the Row
When you get to the last petal, follow the diagram below. Thread the five orange beads, go back through the yellow bead, then go through the next single yellow bead and up through the first two orange beads you added at the beginning of the row. This brings the thread up to the correct position for the next row.
Row 3
In the third row, you'll add a slightly darker bead to get the nice gradation on the petals. I used dark orange.
In these next diagrams, I've lightened the previous beads to focus on only the new beads being added.
Coming out of the light orange bead on Row 2, you'll add five dark orange beads, skip the next light orange bead, and needle through the next single light orange bead, coming out the side. Add a single black bead, then needle through the next light orange bead as shown.
Add five more dark orange beads, skip the next light orange bead, and needle through the next single light orange bead. Add a single black bead. Repeat all the way around.
To finish up the row, do exactly what you did at the end of Row 2, needling through the light orange bead, then the next two dark orange beads as shown in the second diagram.
Row 4
I'm going to mention something that's becoming a little important...you might have noticed that when existing a row, you come out of the second bead from the previous row. I sometimes refer to these as the "shoulders." If you're feeling a little lost, watch for these as your cue of where to insert the needle. (Click on the image for a larger view).
Take a look before continuing on to the next row....ooooooh PINK!!
Row 4 introduces the fuschia beads. As in previous rows, come up through the last two dark orange beads, add five fuschia beads, skip the next dark orange bead, needle through the next single dark orange bead, then add one dark orange, one black, and a second dark orange bead. Needle through the next dark orange bead as shown. Add five fuschia beads, skip the next dark orange, needle through the next dark orange, and so on. Continue around the piece until six petals are complete.
When done, find that "second" or "shoulder" bead and needle up through the dark orange bead and first two fuschia beads, and you're ready for the next row.
Row 5
Row 5 is where things start coming together, and this row is a little different. We'll add five purple beads as we did on the previous rows, skip a fuchsia bead, then needle down through the next fuchsia "shoulder" bead.
Here's where it changes. Next, you'll add three fuchsia beads, needle through the black bead, add three more fuchsia beads, needle through the second fuchsia (shoulder) bead, then add five more purple beads. Continue this pattern all the way around.
IMPORTANT NOTE: There is one more difference on Row 5. At the very end, you'll not only needle through the last two purple beads, but you'll continue through the next two purple beads as well in preparation for softening the curves of the flower petals.

(click for larger view)
Row 6—Adding Curves to the Petals
My very favorite step!
On this new row, you'll add more purple beads and start shaping the petals. In the diagram you'll see that the purple "points" are now a little more flattened...don't worry, they'll get that way as you needle through the three beads at the top.
Coming out of the last four purple beads on the previous row, you'll now add three purple beads, find the "middle" fuchsia bead from the previous step, needle through, add a black bead, needle through the next "middle" fuchsia bead, add three more purple beads, needle through the top three purple beads as shown, and repeat until you've gone all the way around.
There's one more part of this step, though! Take a closer look at the flower on the right.
We need to prepare the flower for the "bail" or loop that's on the top. When you get to the end of the row, needle through the purple edge beads as shown above to get to a place where the loop will be added. (In another tutorial we'll add a more decorative loop at the top, but right now, let's keep it simple...)

Adding the Bail
In the last step, we just need to add a few beads to the top to create a loop for hanging. If you want to use the piece as a pendant, you could also create a beaded "jump ring" to attach it to a leather cord. For earrings, just make two, and attach pre-made earwires.
I like to add the beads, the needle through the other beads in the piece several times to give it more strength. Follow the path shown two or three times, then trim the thread with sharp scissors on the surface, somewhere in the middle of the piece.
Additional Patterns
You can click here to download a pattern sheet that you can color and design your own. I would suggest following the colors above on your first flower, then have fun!
I have also seen these flowers added to other Huichol beaded bracelets, and some with colorful fringe.

Click to download the PDF design sheet
Design Worksheet for Huichol Flowers
You can click here to download a pattern sheet that you can color and design your own. I would suggest following the colors above on your first flower, then have fun!
I have also seen these flowers added to other Huichol beaded bracelets, and some with colorful fringe.
Planning Your Design with an iPad or Tablet
Recolor for iPad
Recolor for Android
As of July 2017, I found a wonderful "tap to color" app that allows you to import a black and white image and color with taps of the finger or stylus. If you're familiar with the "coloring" apps on tablets, you're not actually coloring as you would in an analog coloring book, where you can go outside the lines. With Recolor, the application will process an image into cells that can be filled easily with the tap of the pen. Additionally, there is a gradient mode that will make your design look three-dimensional.

Click to download an image for Recolor
The app is not inexpensive, and requires a subscription, but can be tested after the free download with "tokens." If you like it, the subscription is $9.99 a month, or $59.99 a year. However, for the time it takes for me to create a design in Adobe Illustrator, this is a HUGE timesaver.
To use Recolor or another adult coloring book, click on the flower to the right to download a .JPG image that can be imported into the program.
If you're on your tablet, click the flower image to Save the file to your photos.
Launch Recolor and look for the Import function on the top right corner.
Locate the image in your photos and resize as necessary, click Next.
Choose Original from the styles at the bottom.
The app will process the image to give you cells to color within. Click Done.
Tap on the image to open.
Tap on the image or Continue Coloring to open.
Select Gradients or Solid Colors from the little palette icon on the lower left.
Choose a color. To switch between color families, swipe on the colors at the bottom left to right. You can also tap a color family in the bar above the swatches.
Enjoy!